微信小程序之EasySend
项目介绍
解决移动端和pc端,文字复制和文件传输同步问题。当然ios+MacOs用户自行略过~
移动端
微信小程序 (这里文件模块,采用
<web-view/>组件,只能在开发者工具中可以使用,狗头🐶~)服务端
Springboot + SpringMVC + Mybatis + Redis
这个项目的主要目的,是想走通微信小程序和服务器之间的通信~。毕竟,要记住自己是个后端开发工程师。不熟悉微信小程序的可以先,不熟悉后端开发的,直接进入我的主页~
项目地址:EasySend,可以自行查阅源码~
特征Featrues
- 微信小程序与后端服务器交互
- 服务器端使用Redis缓存文字消息,并设计淘汰算法,只保存近10个文字消息
- 服务器端使用MySQL存储文件信息,并通过数据库的删除和插入操作,只保存近10个文件消息
- 数据库设置文件名唯一索引,文件不可以重复上传
- Springboot的事物回滚的使用
系统展示
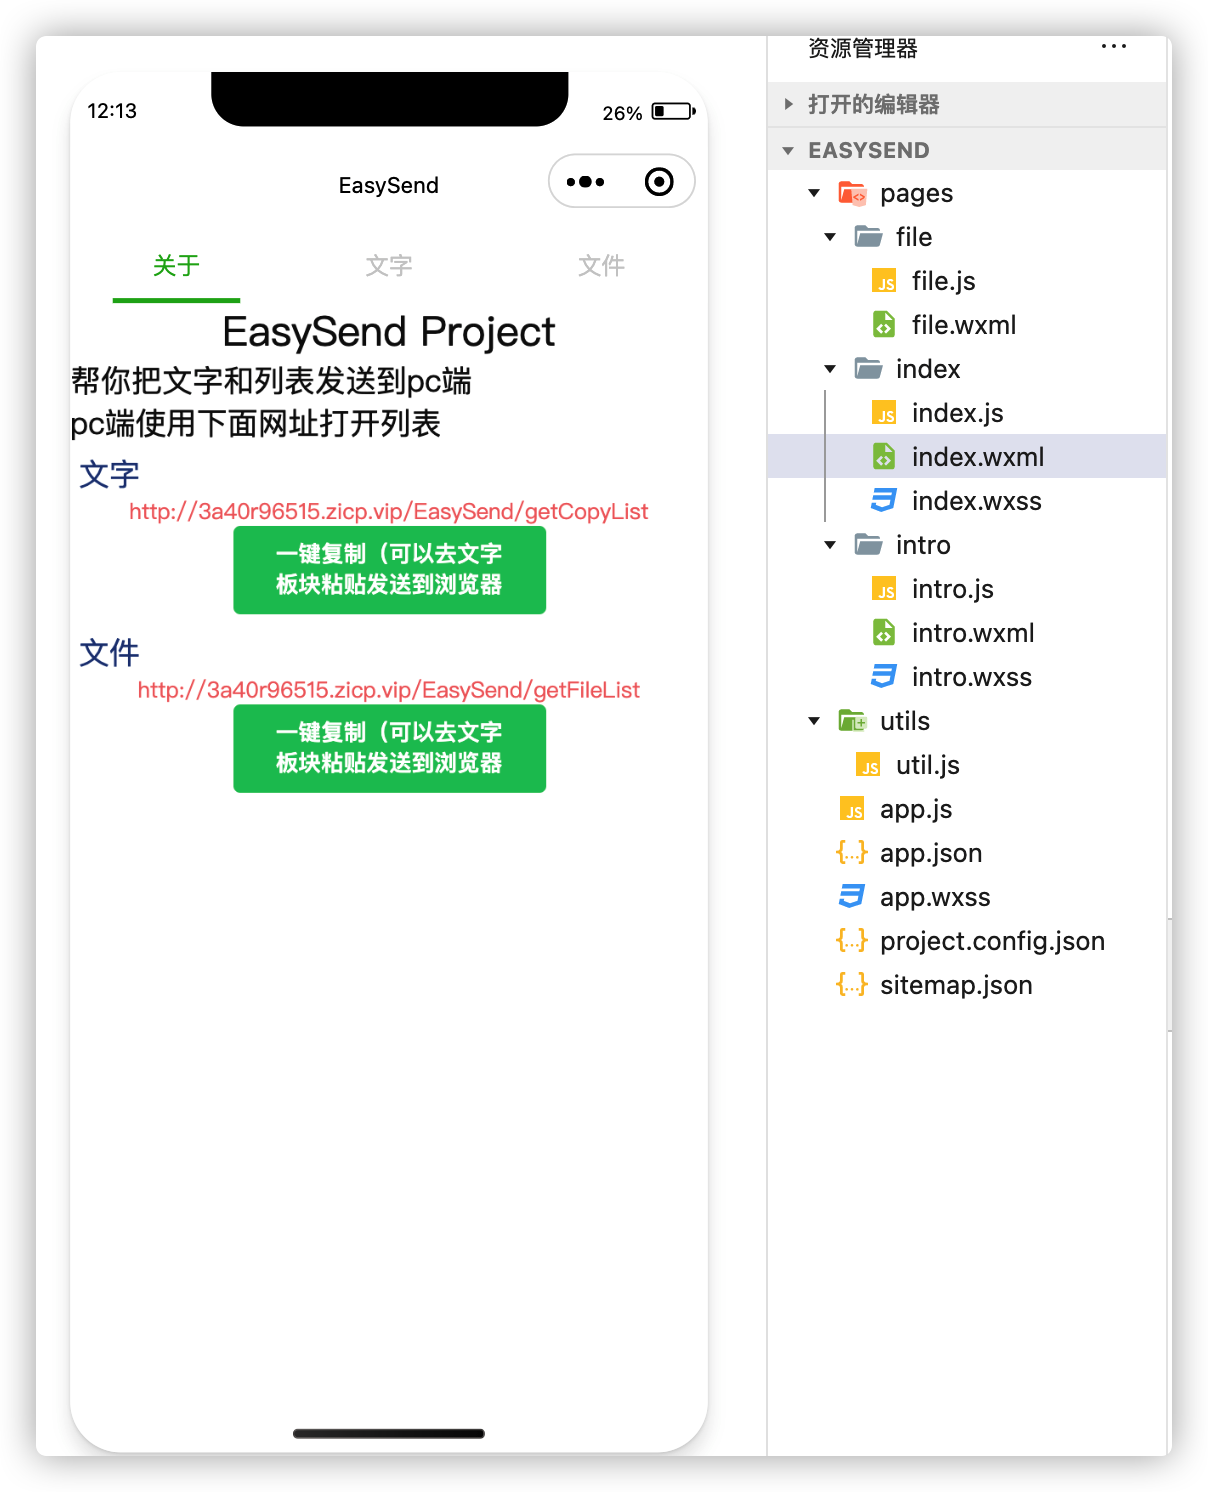
微信小程序页面
运行
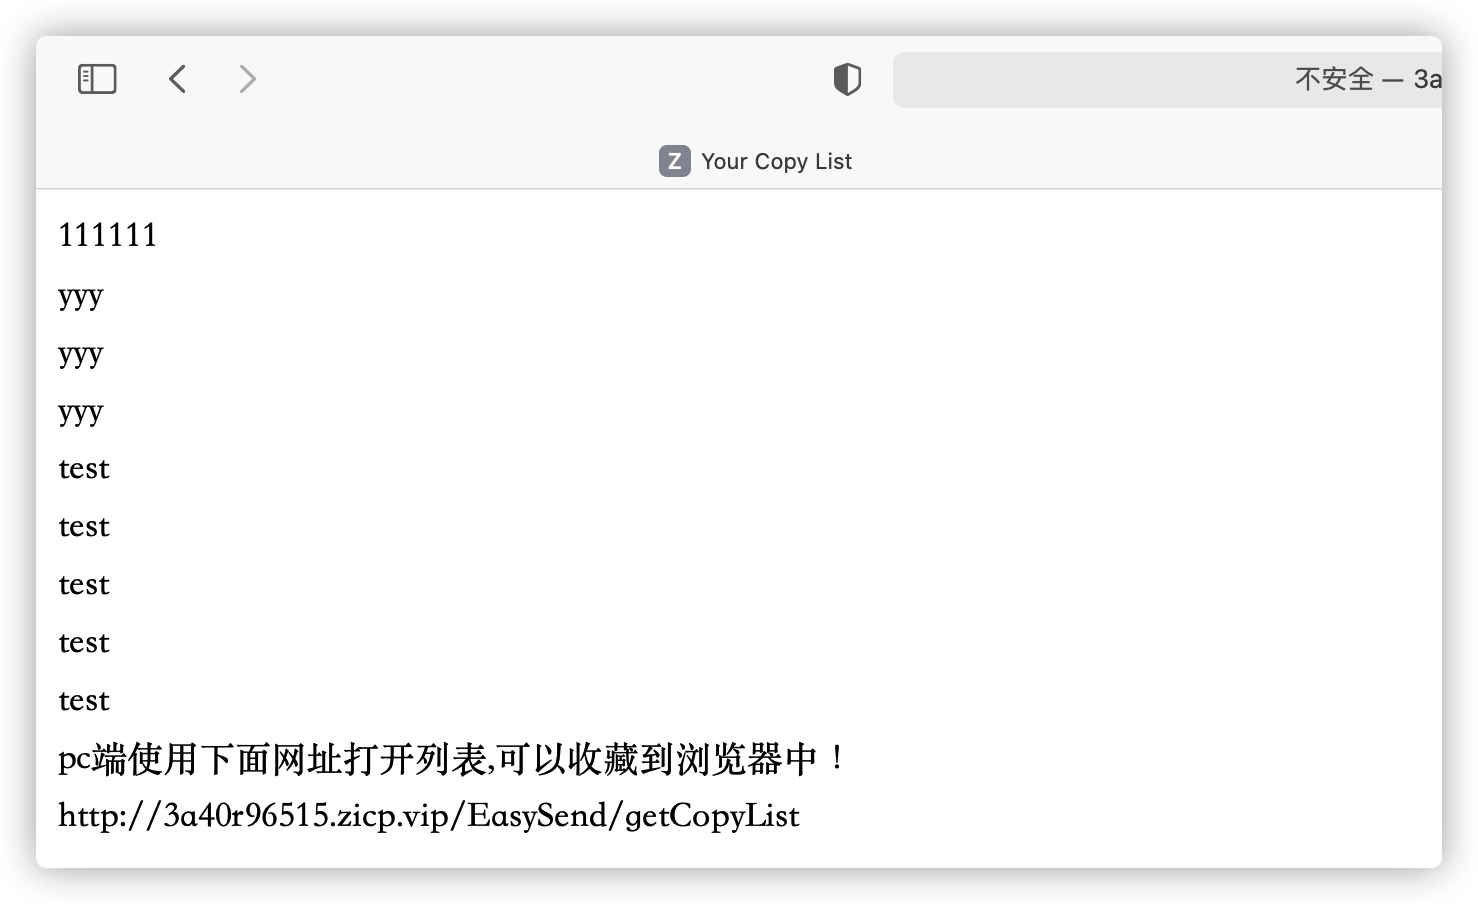
文字复制
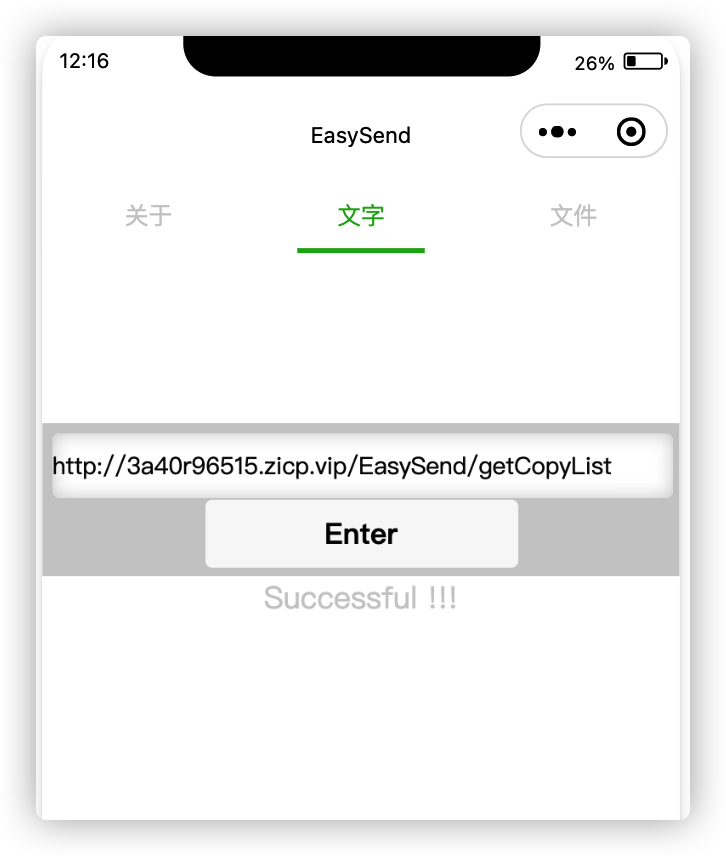
可以在Pc端浏览器打开:
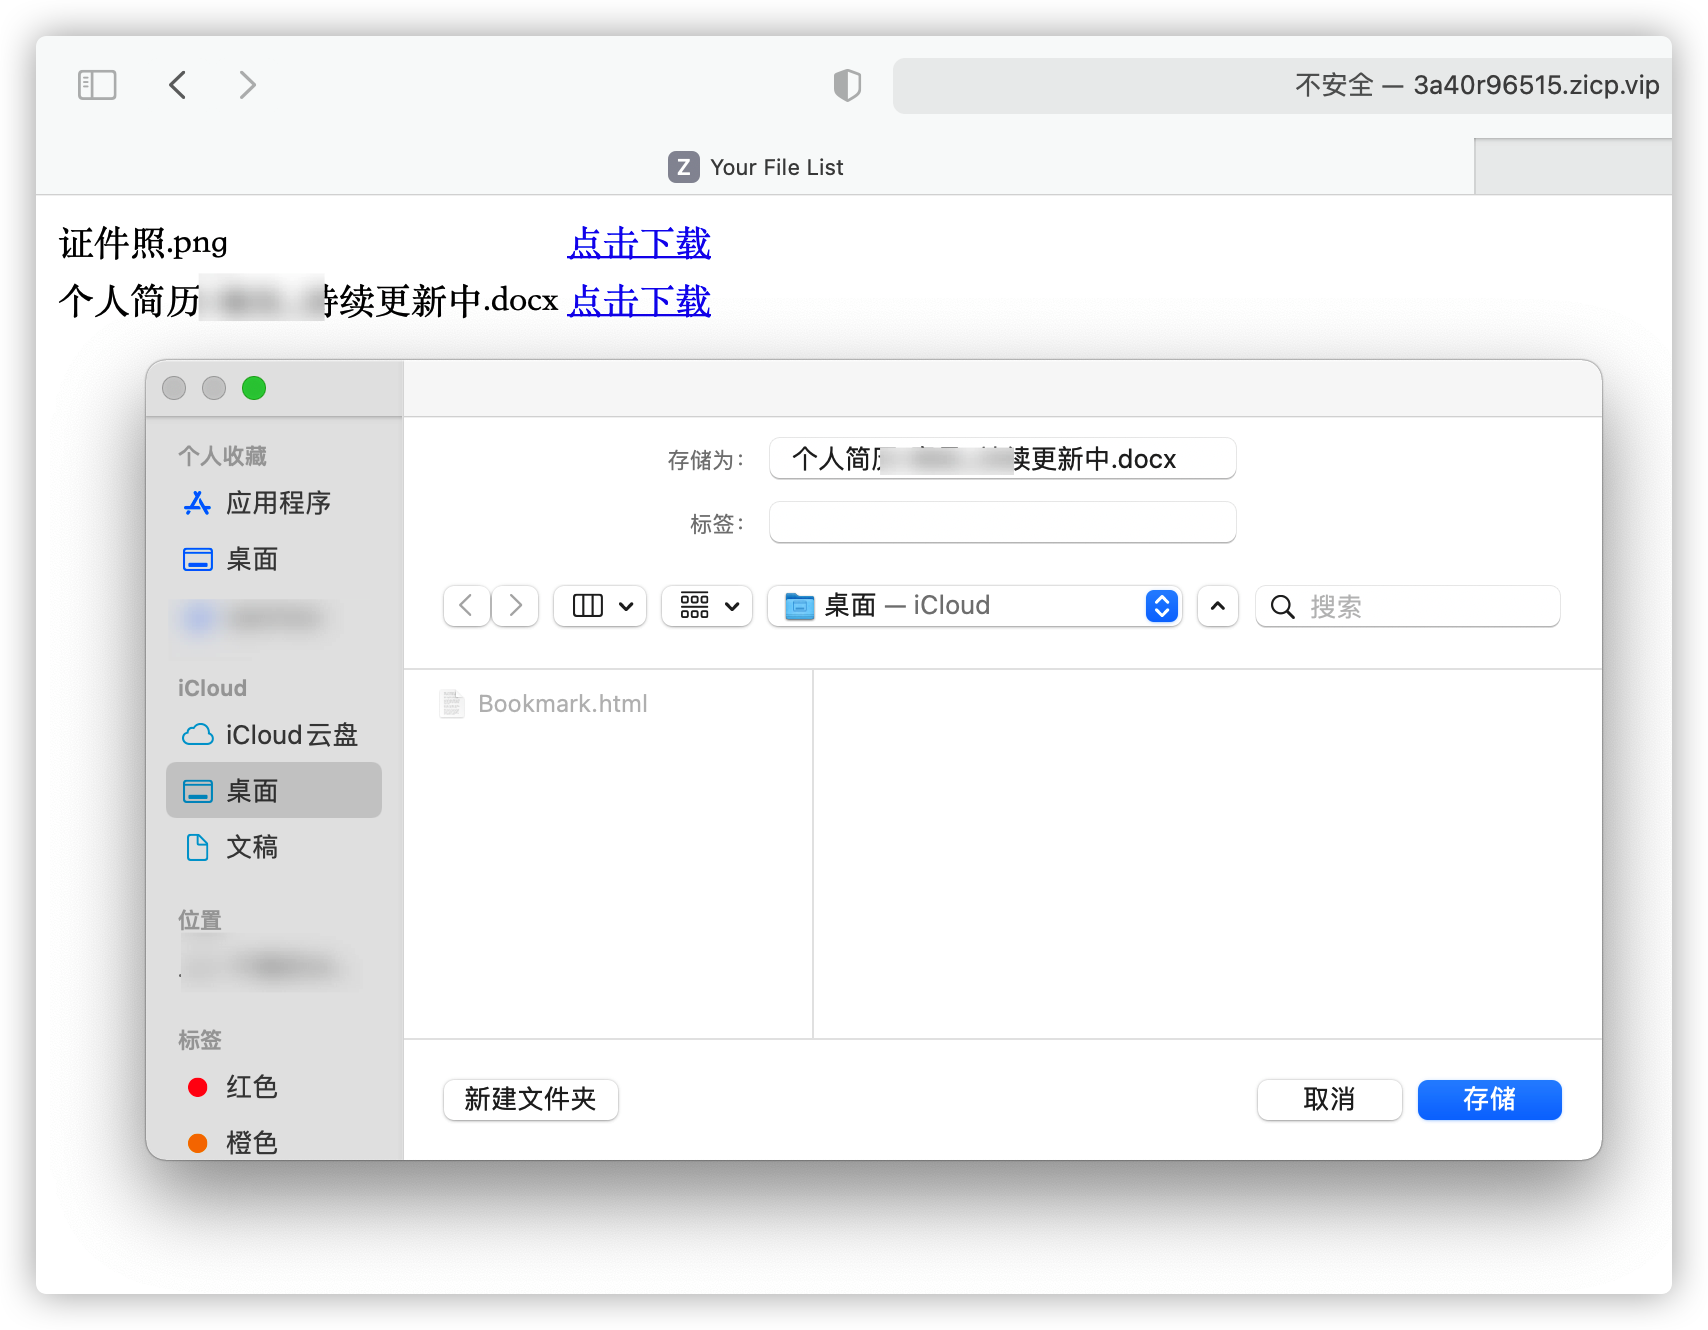
文件传输
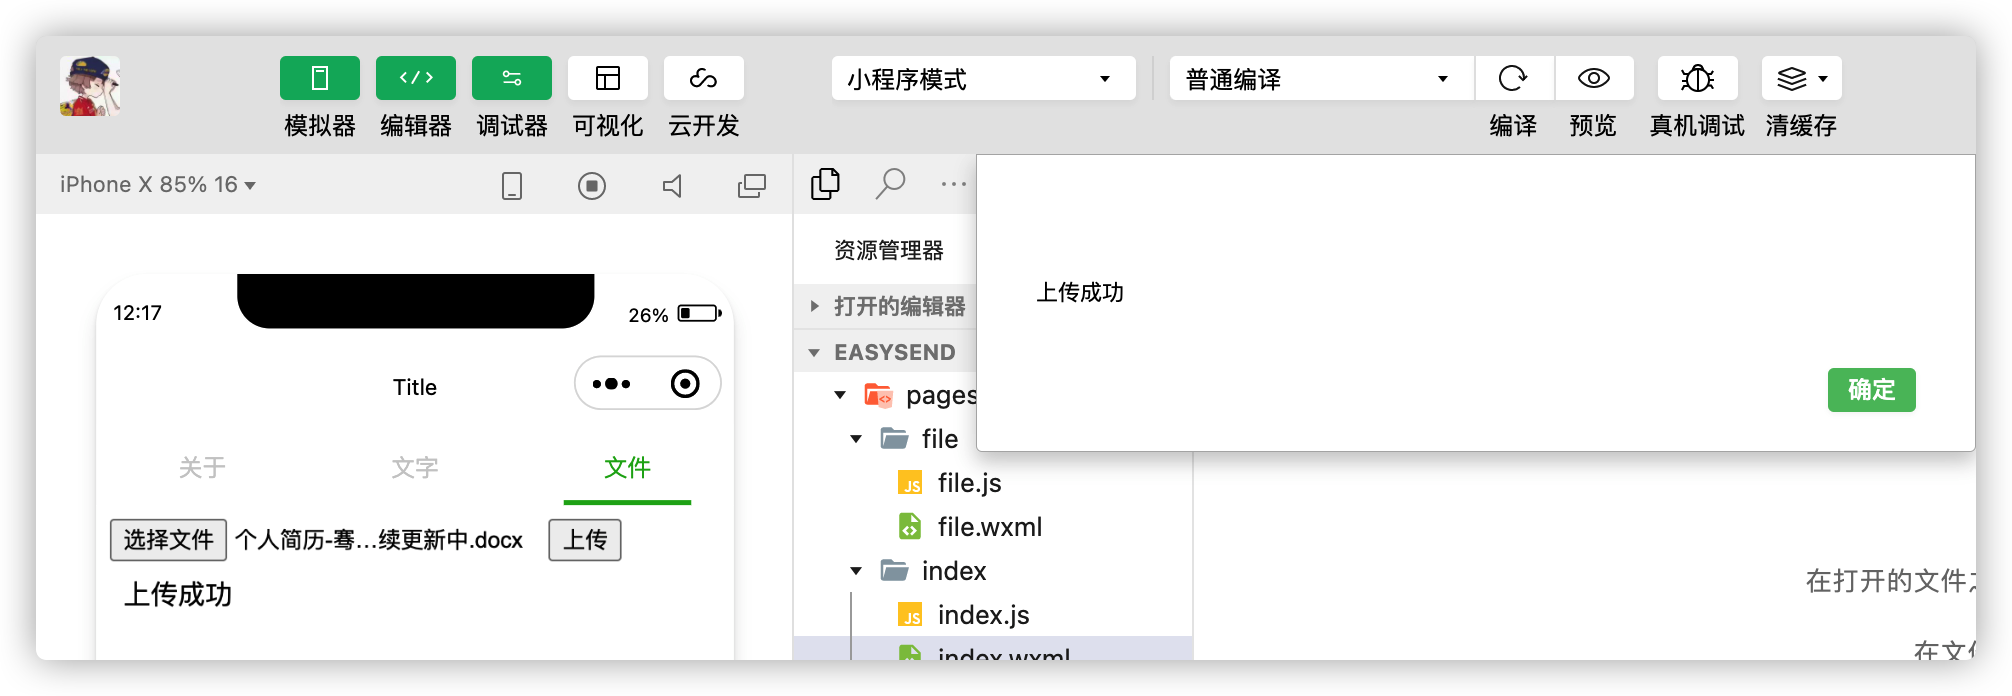
可以在Pc端浏览器打开:
微信小程序设计
移动端的设计,主要分为3个页面:
- 关于页面,简单介绍小程序
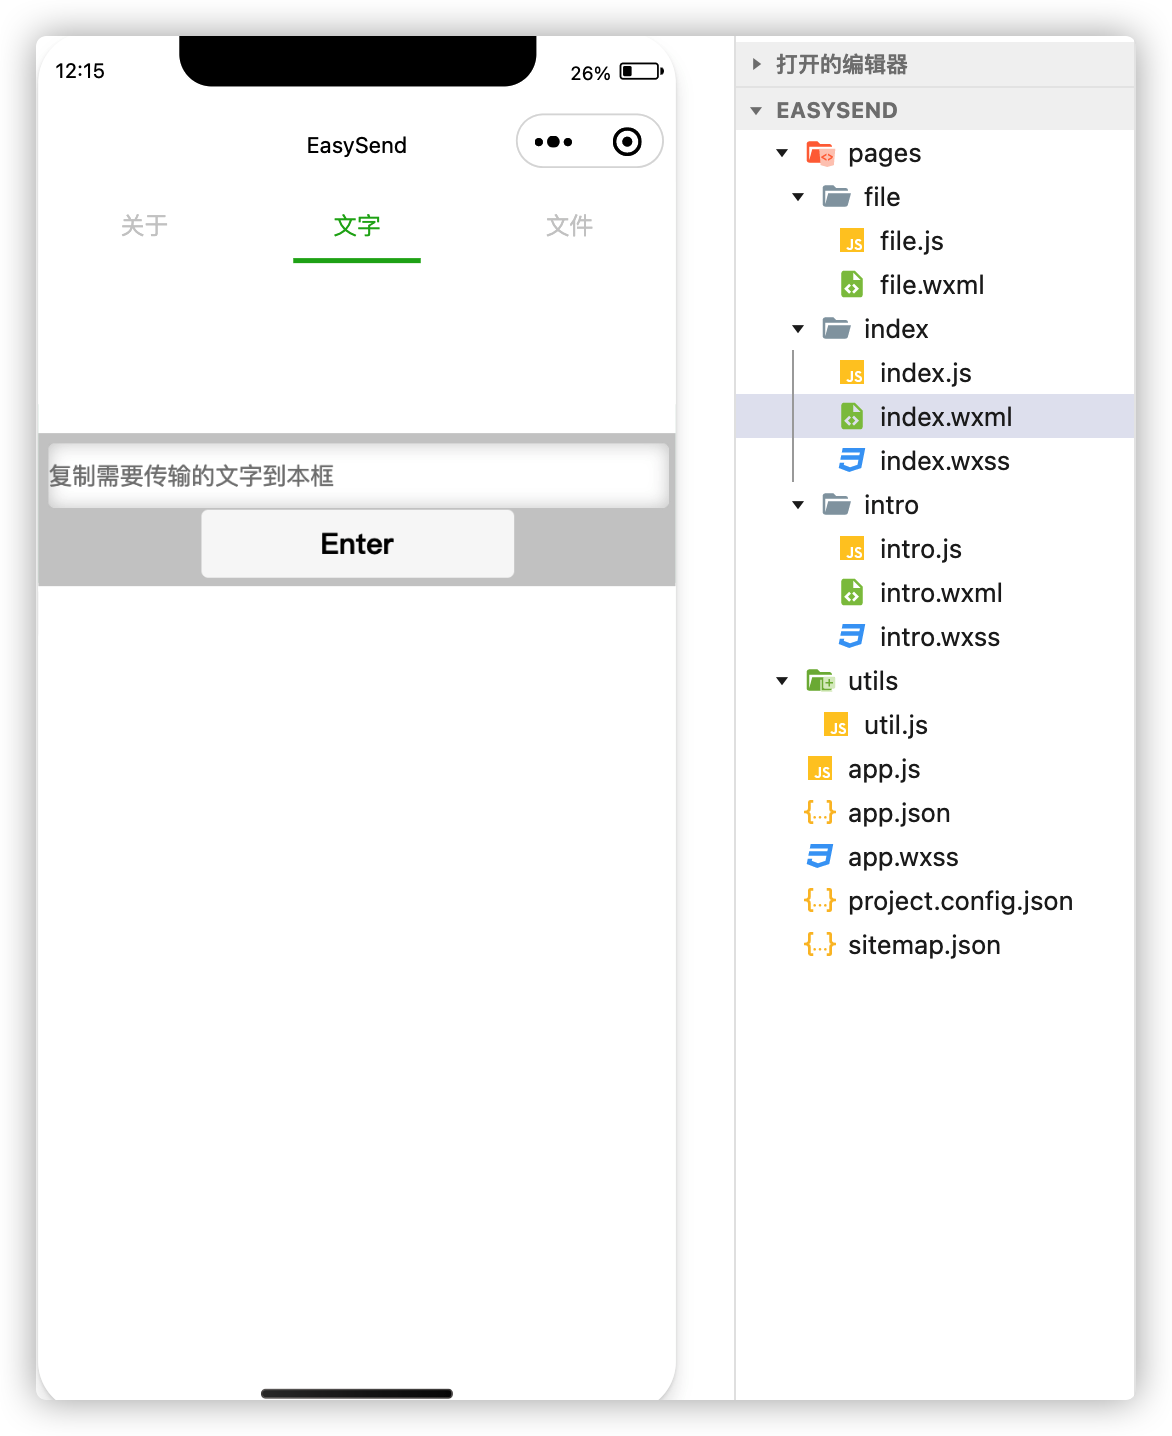
- 文字页面,是提供文字复制交互
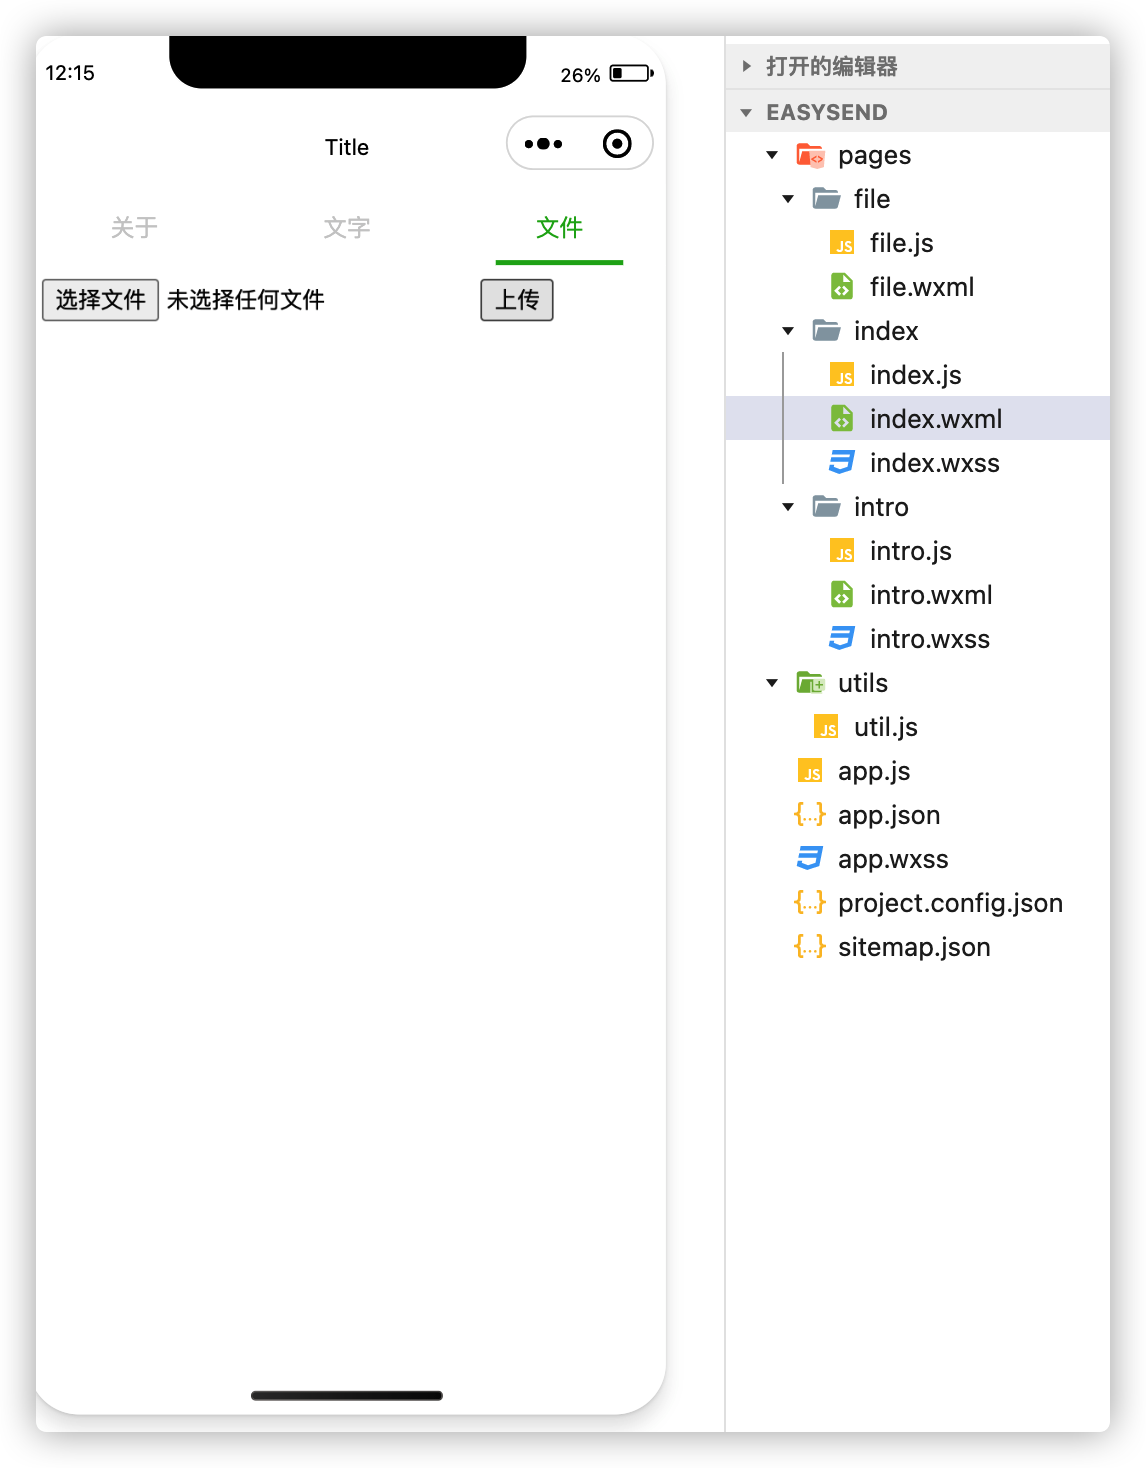
- 文件页面,是提供文件传输交互
- 配置app.json
给小程序进行全局配置,主要是页面配置和tabBar配置。
"pages":[
  "pages/intro/intro",
  "pages/index/index",
  "pages/file/file"
],
"window":{
  "backgroundTextStyle":"light",
  "navigationBarBackgroundColor": "#fff",
  "navigationBarTitleText": "EasySend",
  "navigationBarTextStyle":"black"
},
"tabBar": {
  "position": "top",
  "color": "#ccc",
  "list": [
    {
      "pagePath": "pages/intro/intro",
      "text": "关于"
    },
    {
    "pagePath": "pages/index/index",
    "text": "文字"
    },
    {
      "pagePath": "pages/file/file",
      "text": "文件"
    }
]
},
编写关于页面
我的习惯还是先编写.wxml文件,主要就是几段文字的介绍还有”一键复制按钮”。然后再写.js文件,这里主要说一下按钮,这里用到了一个关于剪切板的api
wx.setClipboardData,可以查看官方文档。//.wxml //... <button class="bun" type="primary" bindtap="bunCopy">一键复制(可以去文字板块粘贴发送到浏览器</button>// .js //... bunCopy: function(res){ wx.setClipboardData({ data: 'http://3a40r96515.zicp.vip/EasySend/getCopyList', success (res) { // wx.getClipboardData({ // success (res) { // console.log(res.data) // data // } // }) } }) },编写文字页面
文字的.wxml由文本输入框和按钮组成,后面加了文字上传的响应结果,成功显示
successfully,失败显示fail。<view class="container"> <view class="search"> <input class="input" placeholder="复制需要传输的文字到本框" bindinput="bindKeyInput"/> <button bindtap="enter">Enter</button> </view> <view class="result">{{result}}</view> </view>在js文件中,还是根据按钮的
点击事件,调用微信的网络请求API。wx.request({ url: 'http://3a40r96515.zicp.vip/EasySend/easyCopy?msg=' + that.data.inputVal, header: { "Content-Type": "application/json" }, success: function (res) { var t = res.data; if(t == 200){ that.setData({ result: 'Successful !!!' }) }else { that.setData({ result: 'Failed !!!' }) } } })编写文件页面
这里是个大坑,也是最狗血的剧情,微信小程序没有提供文件上传api!!!,有关于图片相关的API可以自己查阅。网上搜索了很多资料后,很多人使用
<web-view>组件,通过嵌入html页面来实现文件上传的功能,可以查看组件的官方文档。
<view class="container">
  <web-view class='web' src="http://3a40r96515.zicp.vip/EasySend/index.html"></web-view>
</view> 不过话说回来,这个组件还是蛮强大的~。我们非客户端开发的人,肯定熟悉html比app要多,对吧。注意,这个组件是全屏嵌入多,如果.wxml中还写入了微信小程序的其他组件,是无法显示的。当然是否有其他方法显示,没有查阅🐶。
服务器端设计
终于到了自己熟悉的领域。如介绍所说,后端架构基于Springboot开发,废话少说,直接开始~
依赖引入
这里用到的有Redis、Mybatis、MySQL,我还加了一个插件lombook,它不仅可以提供日志相关的方法,最主要还给JavaBean提供了@Getter和@Setter注解,省区了手动或者IDE生成get和set方法,怎么配置可以去Springboot博客查阅哦~
<parent>
		<groupId>org.springframework.boot</groupId>
		<artifactId>spring-boot-starter-parent</artifactId>
		<version>1.5.2.RELEASE</version>
		<relativePath /> <!-- lookup parent from repository -->
	</parent>
	<dependencies>
		<!-- 集成web -->
		<dependency>
			<groupId>org.springframework.boot</groupId>
			<artifactId>spring-boot-starter-web</artifactId>
		</dependency>
		<!-- 集成Redis -->
		<dependency>
			<groupId>org.springframework.boot</groupId>
			<artifactId>spring-boot-starter-data-redis</artifactId>
		</dependency>
		<!-- 集成freemarker -->
		<dependency>
			<groupId>org.springframework.boot</groupId>
			<artifactId>spring-boot-starter-freemarker</artifactId>
		</dependency>
		<!--Lombok -->
		<dependency>
			<groupId>org.projectlombok</groupId>
			<artifactId>lombok</artifactId>
			<version>1.18.6</version>
		</dependency>
		<dependency>
			<groupId>net.logstash.logback</groupId>
			<artifactId>logstash-logback-encoder</artifactId>
			<version>4.9</version>
		</dependency>
		<!-- Mybatis -->
		<dependency>
			<groupId>org.mybatis.spring.boot</groupId>
			<artifactId>mybatis-spring-boot-starter</artifactId>
			<version>1.1.1</version>
		</dependency>
		<dependency>
			<groupId>mysql</groupId>
			<artifactId>mysql-connector-java</artifactId>
			<version>5.1.46</version>
		</dependency>
	</dependencies>
	<build>
		<plugins>
			<plugin>
				<groupId>org.springframework.boot</groupId>
				<artifactId>spring-boot-maven-plugin</artifactId>
				<version>1.4.2.RELEASE</version>
				<configuration>
					<mainClass>com.qian.EasySendApp</mainClass>
				</configuration>
			</plugin>
		</plugins>
	</build>
注意下面有关于maven插件的配置,是为了打包部署的,这个后面再说~
配置文件
主要对Springboot、Redis、Freemarker和Mysql的配置。都是常见的配置,很多也是通用的,不同的可以自己查阅资料(其实直接用就可以,知道个别关键的属性配置就行)
server:
   port: 80
   context-path: /EasySend
spring:
#redis
   redis:
      host: localhost
      password: 123456
      port: 6379
      pool:
         max-idle: 100
         min-idle: 1
         max-active: 1000
         max-wait: -1
# mysql
   datasource:
      url: jdbc:mysql://localhost:3306/easysend
      username: root
      password: root
      driver-class-name: com.mysql.jdbc.Driver
   freemarker:
      allow-request-override: false
      cache: true
      check-template-location: true
      charset: UTF-8
      content-type: text/html
      expose-request-attributes: false
      expose-session-attributes: false
      expose-spring-macro-helpers: false
      suffix: .ftl
      template-loader-path: classpath:/templates/
#配置上传文件大小 spring.http.multipart.maxFileSize = 10Mb  spring.http.multipart.maxRequestSize=100Mb
   http:
      multipart:
         maxFileSize: 100MB
         maxRequestSize: 200MB
文字复制的开发
设计思路:
从request中读取微信小程序发过来的信息,然后存入Redis中
Redis的值类型为List列表类型
Redis在插入的时候先判断列表长度是否大于10,如果超过就先删除最先加入的信息(类似LRU算法),再插入新消息,返回插入成功
查询时,直接根据Redis的键“msg”查处列表即可
tips: 这里设计的时候,Redis我只用来一个键存储列表消息,把逻辑简化了。但实际上,可以读取小程序的openId之类的,将每个用户的列表分开存储,这里为了简化设计就省去了~
另外,服务端开发是从数据层,到逻辑层,最后是控制层的。
写Redis的相关服务
我已经封装好了常用的方法,在这里找一下。
写业务层
/*
 * 参数:redis的key 功能:新添一个msg
 */
public void addMsg(String msg) {
	List<Object> tmp = (List<Object>) redisService.getList(Constants.MSG);
	redisService.removeStringKey(Constants.MSG);
	LinkedList<Object> list = new LinkedList(tmp);
	while (list.size() > 10) {
		redisService.removeKey(Constants.MSG, (String) list.pollFirst());
	}
	list.offerLast(msg);
	redisService.redisSetList(Constants.MSG, list);
}

/*
 * 参数:redis的key 功能:翻译key的列表list
 */
public List<String> getAllMsg() {
	List<String> tmp = (List<String>) redisService.getList(Constants.MSG);
	LinkedList<String> list = new LinkedList(tmp);
	return list;
}
控制层
@Controller
public class EasyCopyController {

	@Autowired
	private EasySendService easySendService;

	@RequestMapping(value = "/easyCopy")
	@ResponseBody
	public String easyCopy(HttpServletRequest req) {
		// 获取用户移动端msg
		String msg = req.getParameter(Constants.MSG); // 这里后面需要通过用户唯一ID来获取msg
		// 将移动端msg插入Redis
		easySendService.addMsg(msg);
		return Constants.COPY_SUCCESS;
	}

	@RequestMapping("/getCopyList")
	public String getCopyList(HttpServletRequest req) {
		req.setAttribute("listResource", easySendService.getAllMsg());
		return "copy";
	}

}
文件传输的开发
这个涉及到数据库和本地磁盘的存储,会比文字复制模块要复杂一些。
- 从http请求中读取文件,并进行本地存储,同时插入一条数据库记录,返回插入结果成功与否
- 在插入数据时,根据相关标识,判断记录是否大于10,否则需要从第一条记录开始删除,同时在数据库表最后插入新的记录
- 通过特定url查看所有文件列表时,需要查询数据库的所有记录
- 点击下载按钮时,需要通过流输出相关文件
代码步骤如下:
创建数据库
只有3个字段,直接看JavaBean吧
创建实体类
@Setter
@Getter
public class FileEntity {

	private int id;
	private String name;
	private String url;
}
mapper接口
public interface FileMapping {

	/*
	 * 添加文件进数据库
	 */
	@Insert("insert into `file_table` values(null, #{fileEntity.name}, #{fileEntity.url})")
	public void addFile(@Param("fileEntity") FileEntity fileEntity);

	/*
	 * 根据id修改文件
	 */
	@Update("update `file_table` set `name` = #{fileEntity.name}, `url` = #{fileEntity.url} "
			+ "where id = #{id}")
	public void updateFileById(@Param("id") int id, @Param("fileEntity") FileEntity fileEntity);

	/*
	 * 根据id删除文件
	 */
	@Delete("delete from `file_table` where id = #{id}")
	public void removeFileById(int id);
	/*
	 * 查询所有文件
	 */
	@Select("select * from `file_table`")
	public List<FileEntity> getFileList();
}
Service层
具体代码见github源码吧,地址在开头说了~
控制层
注意这里传输文件的时候,我的返回值为void,这里并不需要String。还有是否返回字符串还是页面,可以通过
@ResponseBody注解控制。@RequestMapping("/easyFile") @ResponseBody public String easyFile(@RequestParam(value = "file", required = false) List<MultipartFile> file) { try { easySendService.getData(file); return "上传成功"; } catch (Exception e) { // TODO: handle exception return "上传失败"; } } @RequestMapping("/getFileList") public String getFileList(HttpServletRequest req) { req.setAttribute("listResource", easySendService.getAllFiles()); return "file"; } @RequestMapping("/transWeights") public void transWeights(HttpServletResponse response, HttpServletRequest req) { String url = req.getParameter("url"); easySendService.downloadFile(response, url); }
关于Maven打包项目
打包发布是摆脱IDE的手段~,可以参考这篇文章 使用eclipse对springBoot项目如何进行打包部署
总结
大概花了1天多一点时间写完真个项目,温故了很多知识,也从中知新了一些~