目录:
- Linux安装Elasticsearch
- Mac安装Elasticsearch
- Springboot整合Elasticsearch
参考/来源:
Linux安装Elasticsearch
Elastic 需要 Java 8 环境,注意要保证环境变量JAVA_HOME正确设置。
安装完 Java,就可以跟着官方文档安装 Elastic。直接下载压缩包比较简单。
$ wget https://artifacts.elastic.co/downloads/elasticsearch/elasticsearch-5.5.1.zip
$ unzip elasticsearch-5.5.1.zip
$ cd elasticsearch-5.5.1/
接着,进入解压后的目录,运行下面的命令,启动 Elastic。
$ ./bin/elasticsearch
如果这时报错“max virtual memory areas vm.maxmapcount [65530] is too low”,要运行下面的命令。
$ sudo sysctl -w vm.max_map_count=262144
如果一切正常,Elastic 就会在默认的9200端口运行。这时,打开另一个命令行窗口,请求该端口,会得到说明信息。
$ curl localhost:9200

{
  "name" : "atntrTf",
  "cluster_name" : "elasticsearch",
  "cluster_uuid" : "tf9250XhQ6ee4h7YI11anA",
  "version" : {
    "number" : "5.5.1",
    "build_hash" : "19c13d0",
    "build_date" : "2017-07-18T20:44:24.823Z",
    "build_snapshot" : false,
    "lucene_version" : "6.6.0"
  },
  "tagline" : "You Know, for Search"
}
注意,如果此时报错:curl: (52) Empty reply from server,在config/elasticsearch.yml中,将xpack.security.enabled: true改为xpack.security.enabled: false
上面代码中,请求9200端口,Elastic 返回一个 JSON 对象,包含当前节点、集群、版本等信息。
按下 Ctrl + C,Elastic 就会停止运行。
默认情况下,Elastic 只允许本机访问,如果需要远程访问,可以修改 Elastic 安装目录的config/elasticsearch.yml文件,去掉network.host的注释,将它的值改成0.0.0.0,然后重新启动 Elastic。
network.host: 0.0.0.0
上面代码中,设成0.0.0.0让任何人都可以访问。线上服务不要这样设置,要设成具体的 IP。
Mac安装
官网下载安装
在官网下载mac版本
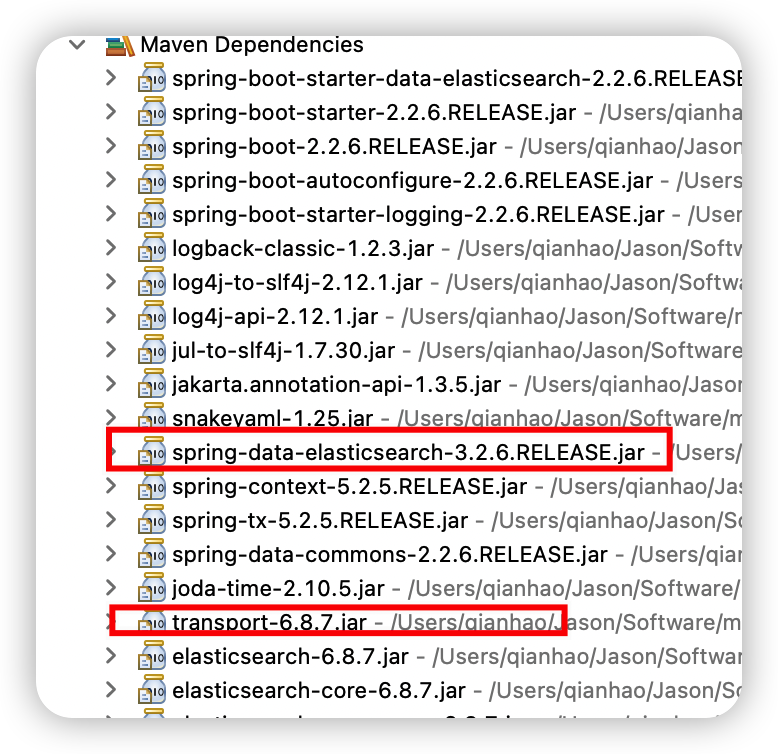
这里一定要注意Springboot、Spring-data-elasticsearch和下载的elasticsearch的版本一致问题
- 我这里使用的springboot为2.2.6
<parent> <groupId>org.springframework.boot</groupId> <artifactId>spring-boot-starter-parent</artifactId> <version>2.2.6.RELEASE</version> <relativePath /> <!-- lookup parent from repository --> </parent>- 查看生成的maven依赖信息

可以看到我这里Spring-data-elasticsearch默认是3.2.6版本,而对应所需要的Elasticsearch版本为6.8.7
所以下载的时候,记得要下载对应版本的Elasticsearch。
使用
tar -zxvf命令解压缩包在Elasticsearch的其他高版本中,还需要在
config/elasticsearch.yml中,将xpack.security.enabled: true改为xpack.security.enabled: false使用
./bin/elasticsearch启动
homebrew安装
# 安装
brew install elasticsearch
# 启动 elasticsearch
Elasticsearch-head插件
是一个可视化数据的插件,在浏览器访问页面即可看见所以数据和集群状态等信息。
官方信息,具体安装步骤如下:
git clone https://github.com/mobz/elasticsearch-head.gitcd elasticsearch-headsudo npm installnpm run start修改config/elasticsearch.yml文件,添加如下参数:
http.cors.enabled:  true
http.cors.allow-origin: "*"
如果不配置,会连接不上elasticsearch集群
浏览器访问
localhost:9100

Springboot整合Elasticsearch
依赖
<dependency>
	<groupId>org.springframework.boot</groupId>
	<artifactId>spring-boot-starter-data-elasticsearch</artifactId>
</dependency>
配置文件
这里也要注意版本问题,每个版本配置信息不同,默认信息也不同
我这里使用的是Elasticsearch6.8.7版本,配置信息如下:
spring:
 data:
  elasticsearch:
   cluster-name: elasticsearch
   cluster-nodes: localhost:9300
注意:
9200作为Http协议,主要用于外部通讯
9300作为Tcp协议,jar之间就是通过tcp协议通讯,ES集群之间是通过9300进行通讯,也是Spring应用程序访问的端口
实体类
常用注解
@Document
注解作用在类上,标记实体类为文档对象,指定实体类与索引对应关系。常用配置项有:
- indexName:索引名称
- type: 索引类型,默认为空(注意,在有些版本中已经废除)
- shards: 主分片数量,默认5
- replicas:复制分片数量,默认1
- createIndex:创建索引,默认为true
@Id
指定文档ID,加上这个注解,文档的_id会与我们的数据ID是一致的,否则在不给定默认值的情况下,es会自动创建。
@Field
指定普通属性,标明这个是文档中的一个字段。常用的配置项有:
- type: 对应Elasticsearch中属性类型。默认自动检测。使用FiledType枚举可以快速获取
public enum FieldType {
	Text,//会进行分词并建立索引的字符类型
	Integer,
	Long,
	Date,
	Float,
	Double,
	Boolean,
	Object,
	Auto,//自动判断字段类型
	Nested,//嵌套对象类型
	Ip,
	Attachment,
	Keyword//不会进行分词建立索引的类型
}
index: 是否创建倒排索引,一般不需要分词的属性不需要创建索引
analyzer:指定索引类型。
store:是否进行存储,默认不进行存储。
其实不管我们将store值设置为true或false,elasticsearch都会将该字段存储到Field域中;但是他们的区别是什么?
- store = false时,默认设置;那么给字段只存储在”_source”的Field域中;
- store = true时,该字段的value会存储在一个跟_source平级的独立Field域中;同时也会存储在_source中,所以有两份拷贝。
那么我们在什么样的业务场景下使用store field功能?
- _source field在索引的mapping 中disable了。这种情况下,如果不将某个field定义成store=true,那些将无法在返回的查询结果中看到这个field。
- _source的内容非常大。这时候如果我们想要在返回的_source document中解释出某个field的值的话,开销会很大(当然你也可以定义source filtering将减少network overhead),比例某个document中保存的是一本书,所以document中可能有这些field: title, date, content。假如我们只是想查询书的title 跟date信息,而不需要解释整个_source(非常大),这个时候我们可以考虑将title, date这些field设置成store=true。
示例
@Data //不设置setter/getter方法,会发现写入不了elasticsearch!!!
@AllArgsConstructor //可能手动构造对象需要!!!
@NoArgsConstructor //反序列化需要!!!
@Document(indexName = "item",createIndex = true)
public class Item {
    @Id
    private Long id;
    // title使用ik进行分词
    @Field(type = FieldType.Text,analyzer = "ik_max_word")
    private String title;
    // brand 不被分词
    @Field(type=FieldType.Keyword)
    private String brand;
    @Field(type=FieldType.Double)
    private Double price;
    // brand 不被分词,且不创建索引
    @Field(index = false,type = FieldType.Keyword)
    private String images;
}
特别提醒,这三个注解特别重要!!!
@Data //不设置setter/getter方法,会发现写入不了elasticsearch!!!
@AllArgsConstructor //可能手动构造对象需要!!!
@NoArgsConstructor //反序列化需要!!!
数据访问层
Springboot可以通过ElasticsearchTemplate和ElasticsearchRepository两种方式整合,推荐使用ElasticsearchRepository。
ElasticsearchRepository(推荐)
Dao层
/**
 * 需要继承ElasticsearchRepository接口
 */
public interface ItemRepository extends ElasticsearchRepository<Item,Long> {
    /**
     * 方法名必须遵守SpringData的规范
     * 价格区间查询
     */
    List<Item> findByTitleLike(String keywords);
}
常用方法
生成规则
Service层
@Service
public class ElasticsearchService {

	@Autowired
	private ElasticDao elasticDao;

	/*
	 * 插入
	 */
	public void add(Item item) {
		elasticDao.deleteAll();
	    // 接收对象集合,实现批量新增
	    elasticDao.save(item);
	}

	/*
	 * 批量插入
	 */
	public void add(List<Item> list) {
		elasticDao.deleteAll();
		elasticDao.saveAll(list);
	}

	/*
	 * 模糊查询
	 */
	public String queryByKeywords(String keyword) {
	    List<Item> list = elasticDao.findByTitleLike(keyword);
	    return JSON.toJSONString(list);
	}
}
Controller层
@RestController
public class ElasticsearchController {

	@Autowired
	private ElasticsearchService elasticsearchService;

	/*
	 * 插入
	 */
	@RequestMapping("/add")
	public String add() {
		Item item = new Item(2L, "iphone13", "iphone", 3699.00, "http://xxx/1.jpg");
		Item item2 = new Item(3L, "iphone12", "iphone", 4499.00, "http://xxx/1.jpg");
	    try {
			elasticsearchService.add(item);
			return "Successfully";
		} catch (Exception e) {
			// TODO: handle exception
			e.printStackTrace();
			return "Failed";
		}
	}

	/*
	 * 批量插入
	 */
	@RequestMapping("/addBatch")
	public String addBatch() {
	    List<Item> list = new ArrayList<>();
	    list.add(new Item(1L, "小米手机7", "小米", 3299.00, "http://xxx/1.jpg"));
	    list.add(new Item(2L, "坚果手机R1", "锤子", 3699.00, "http://xxx/1.jpg"));
	    list.add(new Item(3L, "华为META10", "华为", 4499.00, "http://xxx/1.jpg"));
	    list.add(new Item(4L, "小米Mix2S", "小米", 4299.00, "http://xxx/1.jpg"));
	    list.add(new Item(5L, "荣耀V10", "华为", 2799.00, "http://xxx/1.jpg"));
	    try {
			elasticsearchService.add(list);
			return "Successfully";
		} catch (Exception e) {
			// TODO: handle exception
			e.printStackTrace();
			return "Failed";
		}
	}

	/*
	 * 根据关键词查询
	 */
	@RequestMapping("/query")
	public String queryBykeywords(String keywords) {
		try {
			return elasticsearchService.queryByKeywords(keywords);
		} catch (Exception e) {
			// TODO: handle exception
			e.printStackTrace();
			return "Query Failed";
		}
	}
}
ElasticsearchTemplate
索引管理
ElasticsearchTemplate提供了创建索引的方法,但是不建议使用 ElasticsearchTemplate 对索引进行管理(创建索引,更新映射,删除索引)。
索引就像是数据库或者数据库中的表,我们平时是不会是通过java代码频繁的去创建修改删除数据库或者表的相关信息,我们只会针对数据做CRUD的操作。
// 创建索引
elasticsearchTemplate.createIndex(Class<T> clazz);
// 删除索引,有好几个方法,有兴趣的同学可以自行翻阅源码
elasticsearchTemplate.deleteIndex(Class<T> clazz);
增删查改
这里只列出查找,其他可以参考:https://juejin.cn/post/6976253744342122504#heading-15
@RunWith(SpringRunner.class)
@SpringBootTest(classes = Application.class)
public class ESTest {
    @Autowired
    private ElasticsearchTemplate elasticsearchTemplate;
    @Test
    public void insertItemDocBulk() {
    	List<Item> list = new ArrayList<>();
        list.add(new IndexQueryBuilder().withObject(new Item(1001L,"XXX1","XXX1","XXX1")).build())
        list.add(new IndexQueryBuilder().withObject(new Item(1002L,"XXX2","XXX2","XXX2")).build())
        IndexQuery indexQuery = new IndexQueryBuilder().withObject(item).build();
        elasticsearchTemplate.index(indexQuery);
    }
}


