
目录:
- OAuth2
- Spring Security实现OAuth2
参考/来源:
OAuth2
OAuth是一种用来规范令牌(Token)发放的授权机制,主要包含了四种授权模式:授权码模式、简化模式、密码模式和客户端模式。
四种授权模式
在了解这四种授权模式之前,我们需要先学习一些和OAuth相关的名词。举个社交登录的例子吧,比如在浏览器上使用QQ账号登录虎牙直播,这个过程可以提取出以下几个名词:
- Third-party application 第三方应用程序,比如这里的虎牙直播;
- HTTP service HTTP服务提供商,比如这里的QQ(腾讯);
- Resource Owner 资源所有者,就是QQ的所有人,你;
- User Agent 用户代理,这里指浏览器;
- Authorization server 认证服务器,这里指QQ提供的第三方登录服务;
- Resource server 资源服务器,这里指虎牙直播提供的服务,比如高清直播,弹幕发送等(需要认证后才能使用)。
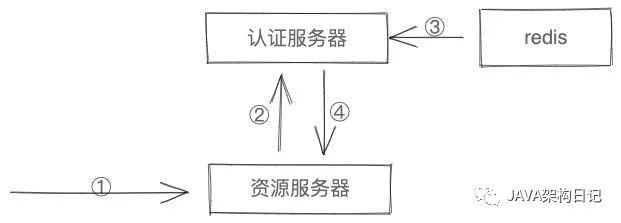
认证服务器和资源服务器可以在同一台服务器上,比如前后端分离的服务后台,它即供认证服务(认证服务器,提供令牌),客户端通过令牌来从后台获取服务(资源服务器);它们也可以不在同一台服务器上,比如上面第三方登录的例子。
授权码模式
授权码模式是最能体现OAuth2协议,最严格,流程最完整的授权模式,流程如下所示:
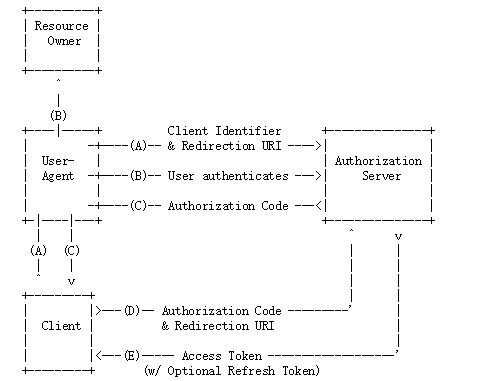
A. 客户端将用户导向认证服务器;
B. 用户决定是否给客户端授权;
C. 同意授权后,认证服务器将用户导向客户端提供的URL,并附上授权码;
D. 客户端通过重定向URL和授权码到认证服务器换取令牌;
E. 校验无误后发放令牌。
其中A步骤,客户端申请认证的URI,包含以下参数:
- response_type:表示授权类型,必选项,此处的值固定为”code”,标识授权码模式
- client_id:表示客户端的ID,必选项
- redirect_uri:表示重定向URI,可选项
- scope:表示申请的权限范围,可选项
- state:表示客户端的当前状态,可以指定任意值,认证服务器会原封不动地返回这个值。
D步骤中,客户端向认证服务器申请令牌的HTTP请求,包含以下参数:
- grant_type:表示使用的授权模式,必选项,此处的值固定为”authorization_code”。
- code:表示上一步获得的授权码,必选项。
- redirect_uri:表示重定向URI,必选项,且必须与A步骤中的该参数值保持一致。
- client_id:表示客户端ID,必选项。
密码模式
在密码模式中,用户像客户端提供用户名和密码,客户端通过用户名和密码到认证服务器获取令牌。流程如下所示:
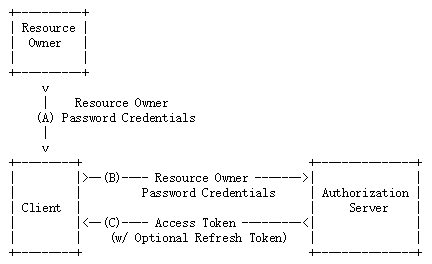
A. 用户向客户端提供用户名和密码;
B. 客户端向认证服务器换取令牌;
C. 发放令牌。
B步骤中,客户端发出的HTTP请求,包含以下参数:
- grant_type:表示授权类型,此处的值固定为”password”,必选项。
- username:表示用户名,必选项。
- password:表示用户的密码,必选项。
- scope:表示权限范围,可选项。
剩下两种授权模式可以参考上面的参考链接,这里就不介绍了。
Spring Security实现OAuth2
Spring框架对OAuth2协议进行了实现,Spring Security OAuth2主要包含认证服务器和资源服务器这两大块的实现:
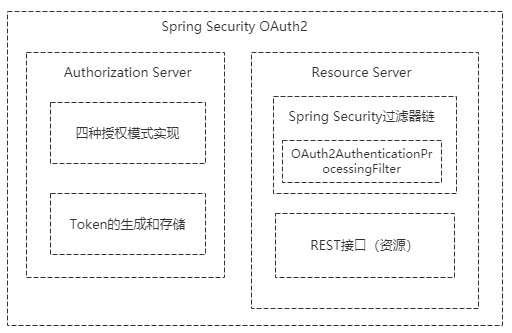
认证服务器主要包含了四种授权模式的实现和Token的生成与存储,我们也可以在认证服务器中自定义获取Token的方式(JWT);
资源服务器主要是在Spring Security的过滤器链上加了OAuth2AuthenticationProcessingFilter过滤器,即使用OAuth2协议发放令牌认证的方式来保护我们的资源。
依赖
Springboot和spring-security-oauth2的不同版本,代码会有差异,建议和本例一致。
<parent>
		<groupId>org.springframework.boot</groupId>
		<artifactId>spring-boot-starter-parent</artifactId>
		<version>2.0.1.RELEASE</version>
		<relativePath /> <!-- lookup parent from repository -->
	</parent>
	<groupId>com.jason</groupId>
	<artifactId>SpringSecurityOAuth2Demo</artifactId>
	<version>0.0.1-SNAPSHOT</version>
	<name>SpringSecurityOAuth2Demo</name>
	<description>SpringSecurityOAuth2Demo</description>
	<properties>
		<java.version>1.8</java.version>
	</properties>
	<dependencies>
        <!-- 注意是starter,自动配置 -->
        <dependency>
            <groupId>org.springframework.boot</groupId>
            <artifactId>spring-boot-starter-security</artifactId>
        </dependency>
        <!-- 不是starter,手动配置 -->
        <dependency>
            <groupId>org.springframework.security.oauth</groupId>
            <artifactId>spring-security-oauth2</artifactId>
            <version>2.3.2.RELEASE</version>
        </dependency>
        <dependency>
            <groupId>org.springframework.boot</groupId>
            <artifactId>spring-boot-starter-web</artifactId>
        </dependency>
        <!-- 将token存储在redis中 -->
        <dependency>
            <groupId>org.springframework.boot</groupId>
            <artifactId>spring-boot-starter-data-redis</artifactId>
        </dependency>
        <dependency>
            <groupId>org.springframework.boot</groupId>
            <artifactId>spring-boot-starter-actuator</artifactId>
        </dependency>
    </dependencies>

	<build>
		<plugins>
			<plugin>
				<groupId>org.springframework.boot</groupId>
				<artifactId>spring-boot-maven-plugin</artifactId>
			</plugin>
		</plugins>
	</build>
配置文件
server:
   port: 80

spring:
#redis
   redis:
      host: localhost
      password: 123456
      port: 6379
      pool:
         max-idle: 100
         min-idle: 1
         max-active: 1000
         max-wait: -1
创建认证和资源服务器
@Configuration
public class OAuth2ServerConfig {

    private static final String DEMO_RESOURCE_ID = "order";

    @Configuration
    @EnableResourceServer
    protected static class ResourceServerConfiguration extends ResourceServerConfigurerAdapter {

        @Override
        public void configure(ResourceServerSecurityConfigurer resources) {
            resources.resourceId(DEMO_RESOURCE_ID).stateless(true);
        }

        @Override
        public void configure(HttpSecurity http) throws Exception {
            http
                .authorizeRequests()
                    .antMatchers("/order/**").authenticated();//配置order访问控制,必须认证过后才可以访问

        }
    }


    @Configuration
    @EnableAuthorizationServer
    protected static class AuthorizationServerConfiguration extends AuthorizationServerConfigurerAdapter {

        @Autowired
        AuthenticationManager authenticationManager;
        @Autowired
        RedisConnectionFactory redisConnectionFactory;


        @Override
        public void configure(ClientDetailsServiceConfigurer clients) throws Exception {

//        password 方案一:明文存储,用于测试,不能用于生产
//        String finalSecret = "123456";
//        password 方案二:用 BCrypt 对密码编码
//        String finalSecret = new BCryptPasswordEncoder().encode("123456");
            // password 方案三:支持多种编码,通过密码的前缀区分编码方式
            String finalSecret = "{bcrypt}"+new BCryptPasswordEncoder().encode("123456");
            //配置两个客户端,一个用于password认证一个用于client认证
            clients.inMemory().withClient("client_1")
                    .resourceIds(DEMO_RESOURCE_ID)
                    .authorizedGrantTypes("client_credentials", "refresh_token")
                    .scopes("select")
                    .authorities("oauth2")
                    .secret(finalSecret)
                    .and().withClient("client_2")
                    .resourceIds(DEMO_RESOURCE_ID)
                    .authorizedGrantTypes("password", "refresh_token")
                    .scopes("select")
                    .authorities("oauth2")
                    .secret(finalSecret);
        }

        @Override
        public void configure(AuthorizationServerEndpointsConfigurer endpoints) {
            endpoints
                    .tokenStore(new RedisTokenStore(redisConnectionFactory))
                    .authenticationManager(authenticationManager)
                    .allowedTokenEndpointRequestMethods(HttpMethod.GET, HttpMethod.POST);
        }

        @Override
        public void configure(AuthorizationServerSecurityConfigurer oauthServer) {
            //允许表单认证
            oauthServer.allowFormAuthenticationForClients();
        }

    }

}
Spring Security配置类
@Configuration
@EnableWebSecurity
public class SecurityConfiguration extends WebSecurityConfigurerAdapter {


//    @Override
//    protected void configure(AuthenticationManagerBuilder auth) throws Exception {
//        auth.inMemoryAuthentication().passwordEncoder(new BCryptPasswordEncoder());
//    }


    @Bean
    @Override
    protected UserDetailsService userDetailsService(){
        BCryptPasswordEncoder bCryptPasswordEncoder = new BCryptPasswordEncoder();
//        password 方案一:明文存储,用于测试,不能用于生产
//        String finalPassword = "123456";
//        password 方案二:用 BCrypt 对密码编码
//        String finalPassword = bCryptPasswordEncoder.encode("123456");
        // password 方案三:支持多种编码,通过密码的前缀区分编码方式
        String finalPassword = "{bcrypt}"+bCryptPasswordEncoder.encode("123456");
        InMemoryUserDetailsManager manager = new InMemoryUserDetailsManager();
        manager.createUser(User.withUsername("user_1").password(finalPassword).authorities("USER").build());
        manager.createUser(User.withUsername("user_2").password(finalPassword).authorities("USER").build());
        return manager;
    }

    /**
     * springboot2.0 删除了原来的 plainTextPasswordEncoder
     * https://docs.spring.io/spring-security/site/docs/5.0.4.RELEASE/reference/htmlsingle/#10.3.2 DelegatingPasswordEncoder
     *
     */
    // password 方案一:明文存储,用于测试,不能用于生产
//    @Bean
//    PasswordEncoder passwordEncoder(){
//        return NoOpPasswordEncoder.getInstance();
//    }

    // password 方案二:用 BCrypt 对密码编码
//    @Bean
//    PasswordEncoder passwordEncoder(){
//        return new BCryptPasswordEncoder();
//    }

    // password 方案三:支持多种编码,通过密码的前缀区分编码方式,推荐
    @Bean
    PasswordEncoder passwordEncoder(){
        return PasswordEncoderFactories.createDelegatingPasswordEncoder();
    }

//
//    /**
//     * 这一步的配置是必不可少的,否则SpringBoot会自动配置一个AuthenticationManager,覆盖掉内存中的用户
//     */
    @Bean
    @Override
    public AuthenticationManager authenticationManagerBean() throws Exception {
        AuthenticationManager manager = super.authenticationManagerBean();
        return manager;
    }

    @Override
    protected void configure(HttpSecurity http) throws Exception {
        // @formatter:off
        http
            .requestMatchers().anyRequest()
            .and()
                .authorizeRequests()
                .antMatchers("/oauth/**").permitAll();
        // @formatter:on
    }
}
接口
@RestController
public class TestEndpoints {

    @GetMapping("/product/{id}")
    public String getProduct(@PathVariable String id) {
        //for debug
        Authentication authentication = SecurityContextHolder.getContext().getAuthentication();
        return "product id : " + id;
    }

    @GetMapping("/order/{id}")
    public String getOrder(@PathVariable String id) {
        //for debug
        Authentication authentication = SecurityContextHolder.getContext().getAuthentication();
        return "order id : " + id;
    }

}
获取令牌
这里演示密码模式。
访问http://localhost:8080/oauth/token,参数如下
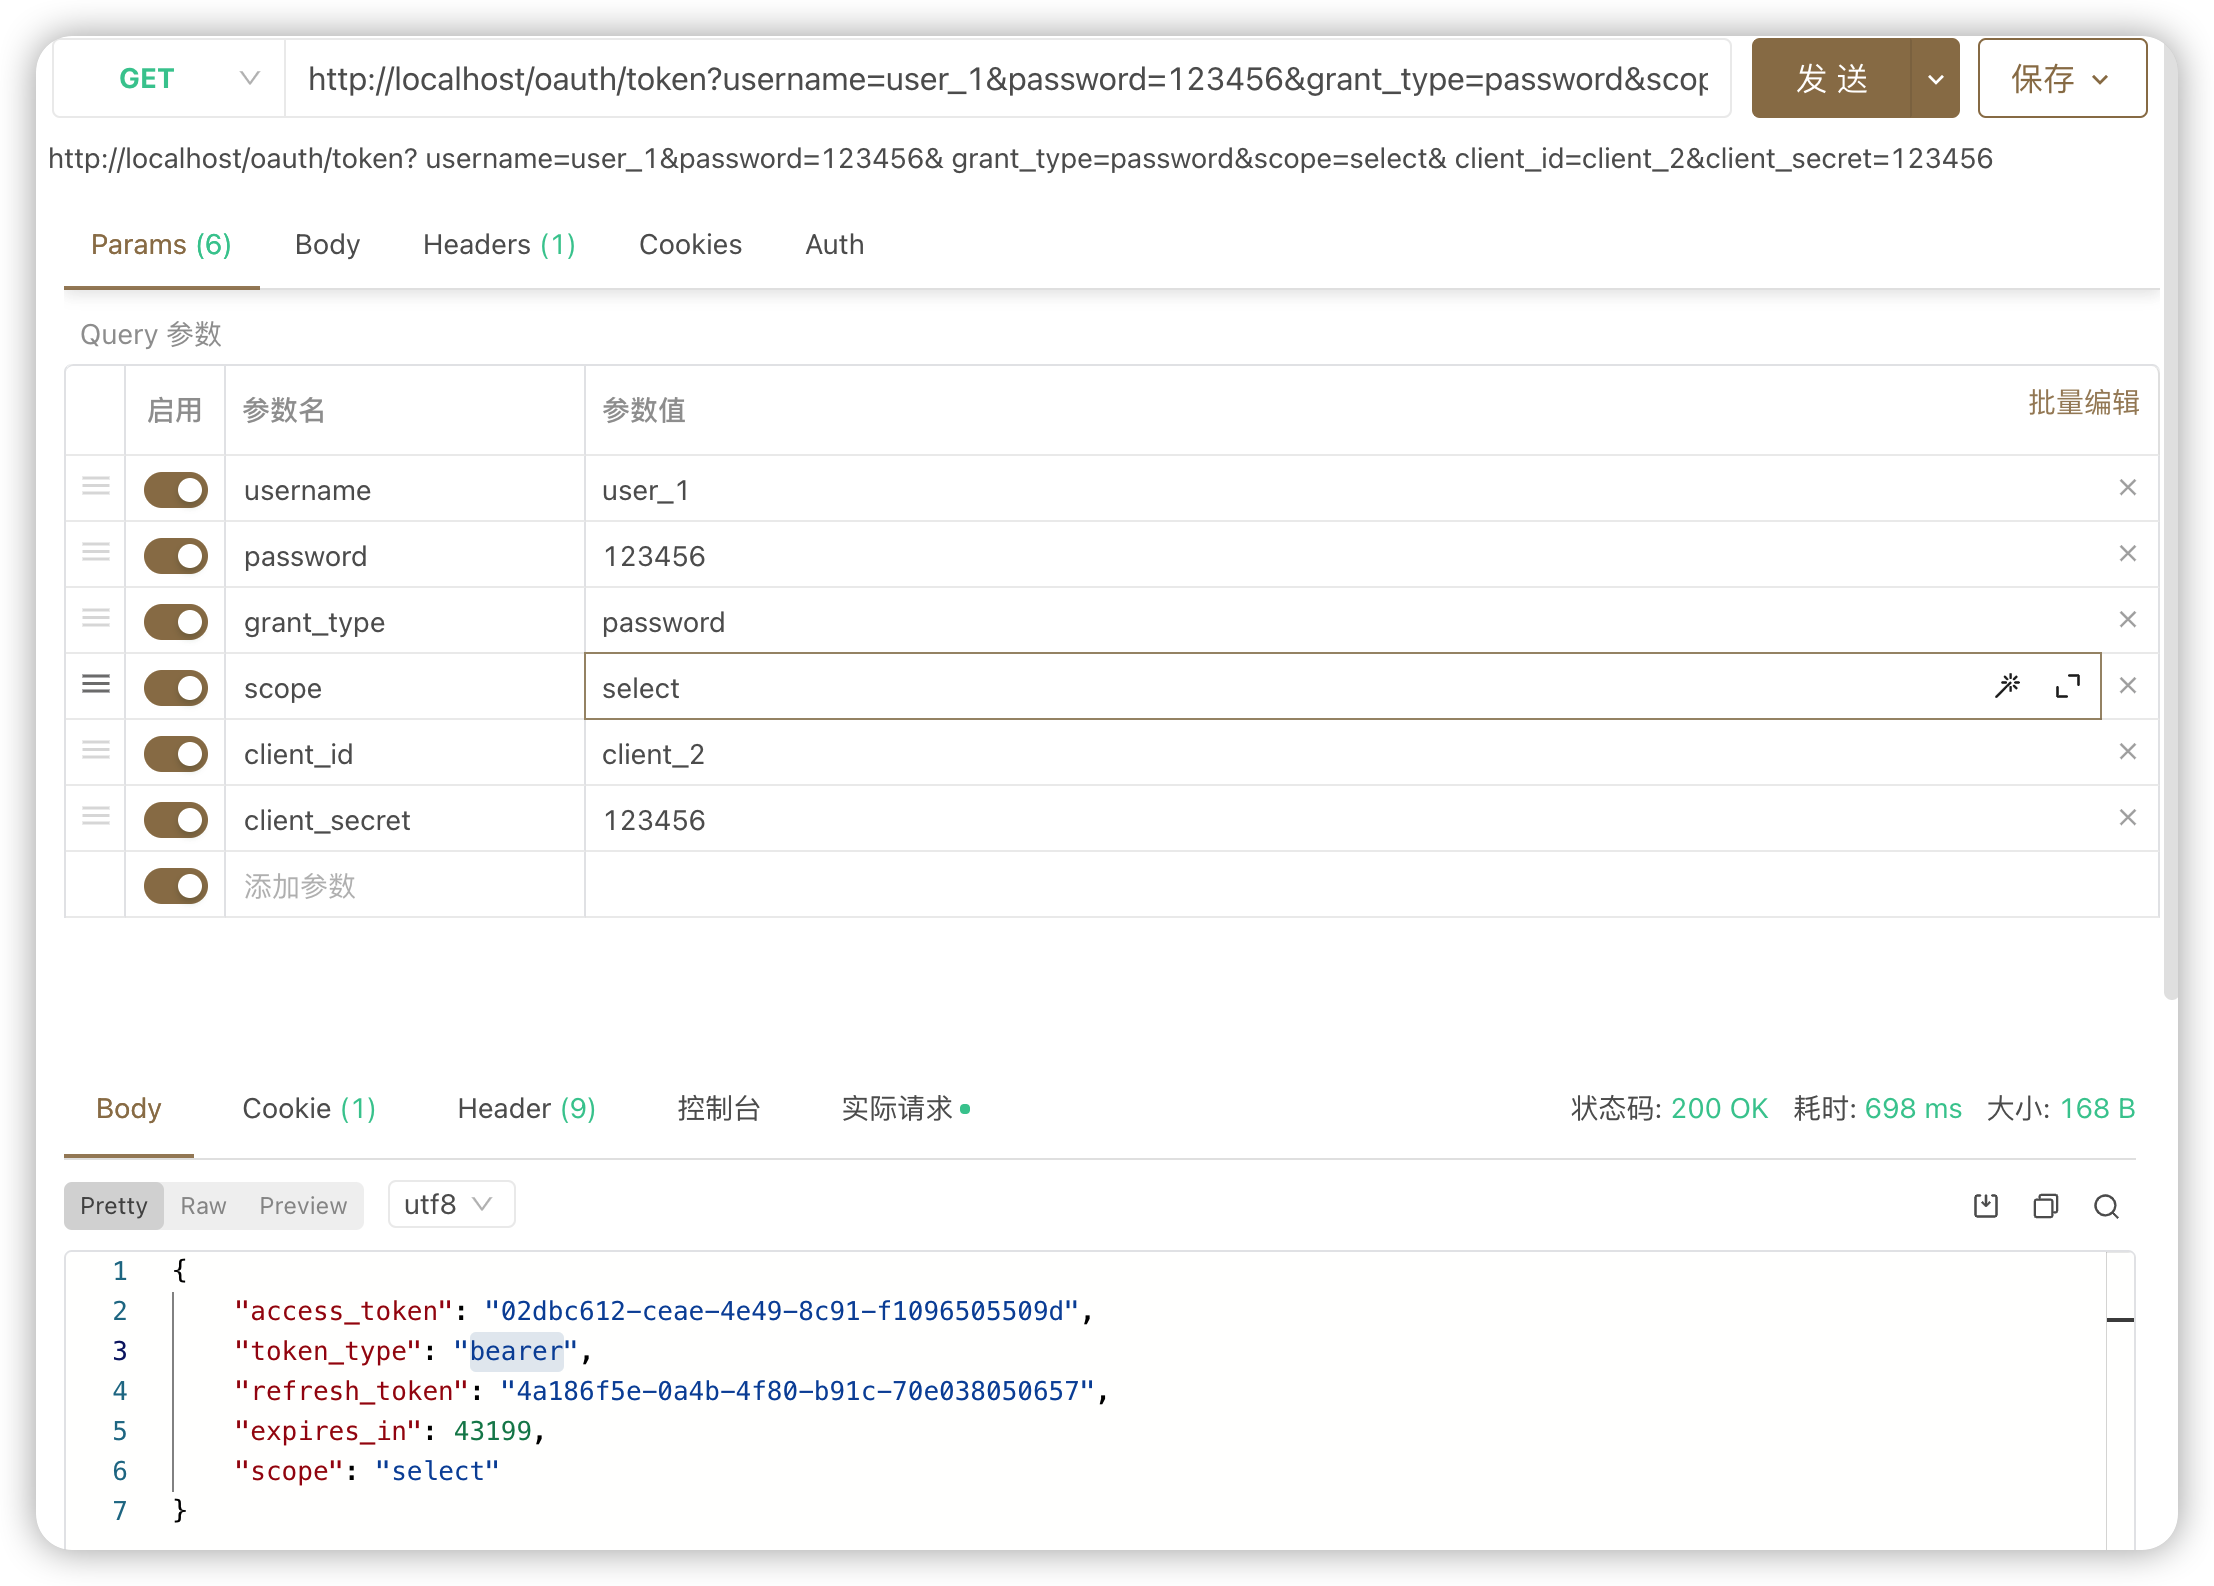
注意,还要添加请求头:
- Key: Authorization
- Value: 使用Base64编码工具对
client_id:client_secret进行编码,并在前面加上Basic + 空格
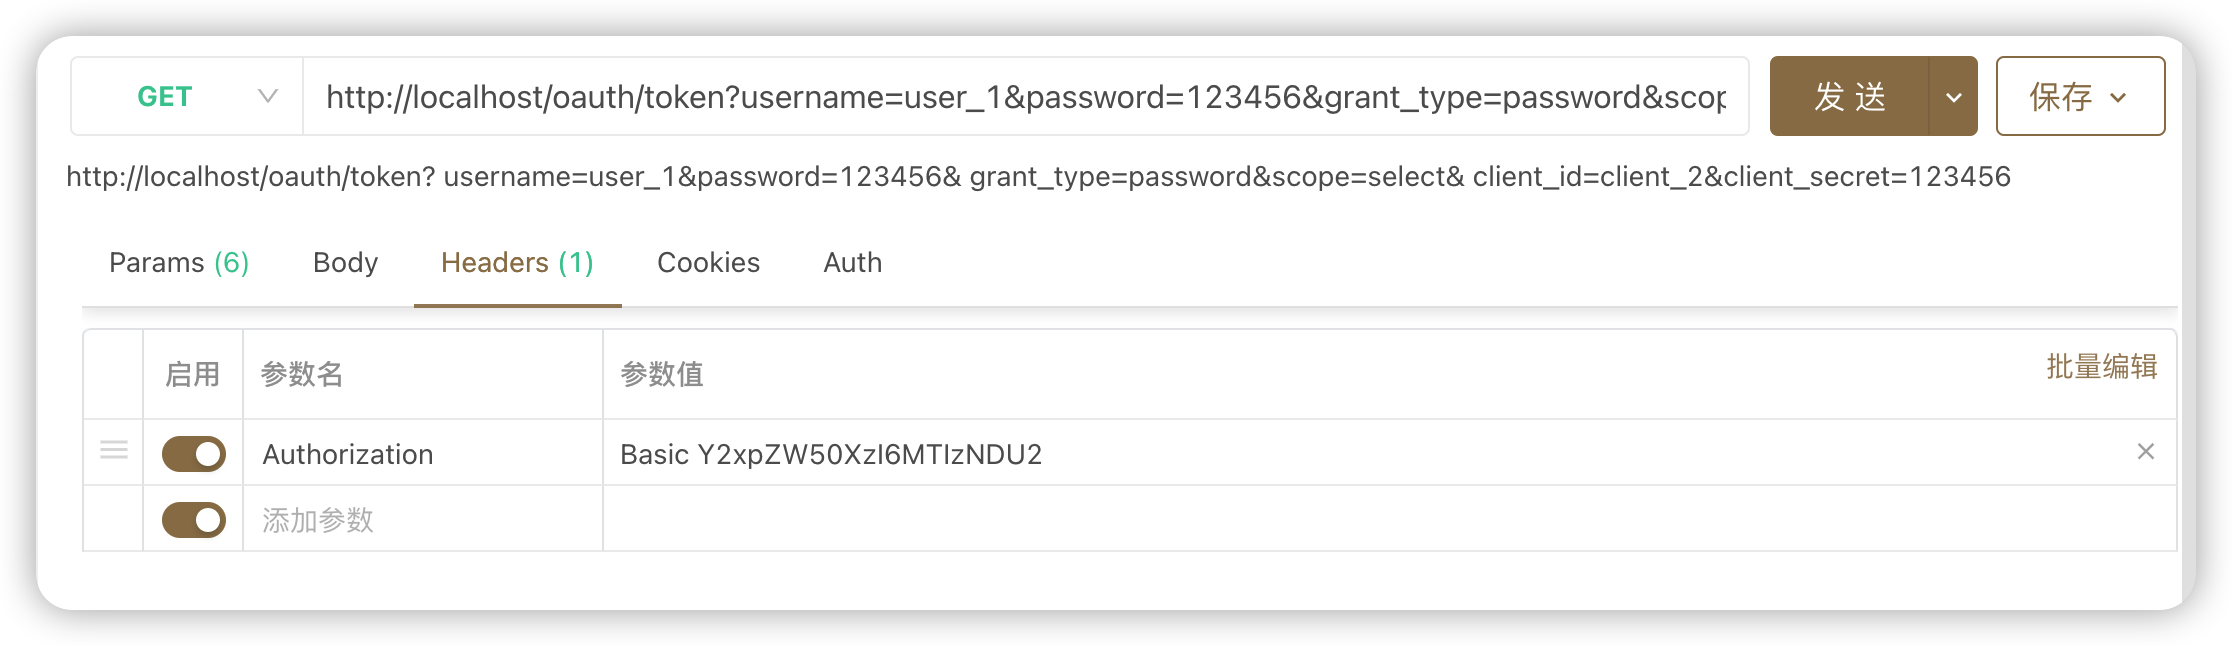
即可得到如下返回结果:
{
    "access_token": "02dbc612-ceae-4e49-8c91-f1096505509d",
    "token_type": "bearer",
    "refresh_token": "4a186f5e-0a4b-4f80-b91c-70e038050657",
    "expires_in": 43199,
    "scope": "select"
}
请求资源
发送请求
http://localhost/order/1带上
access_token参数: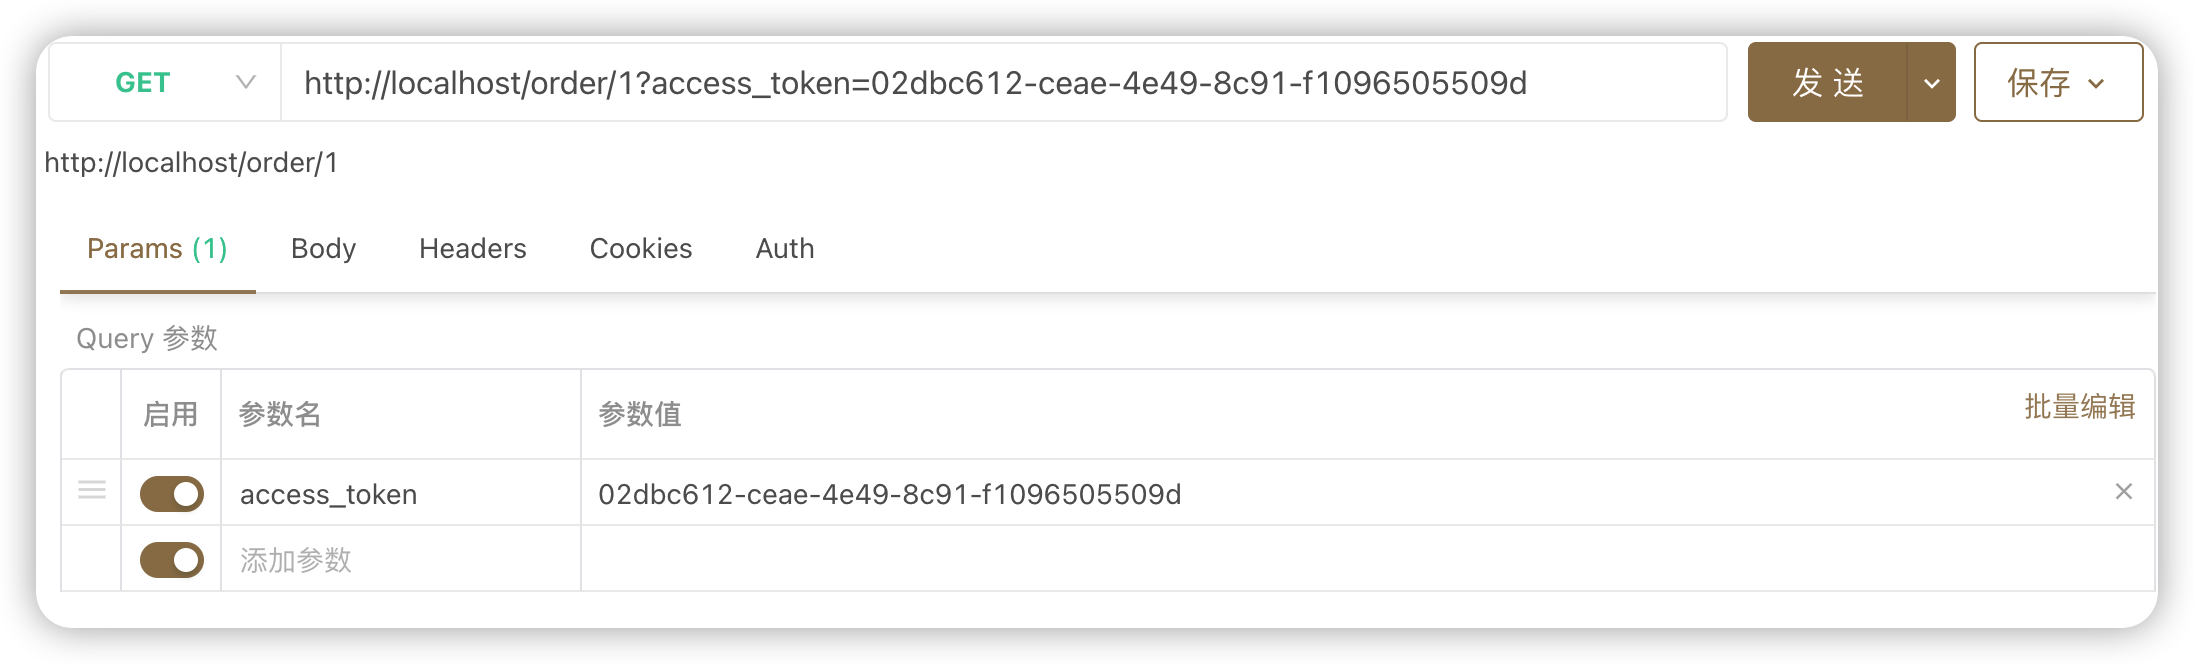
成功获得信息

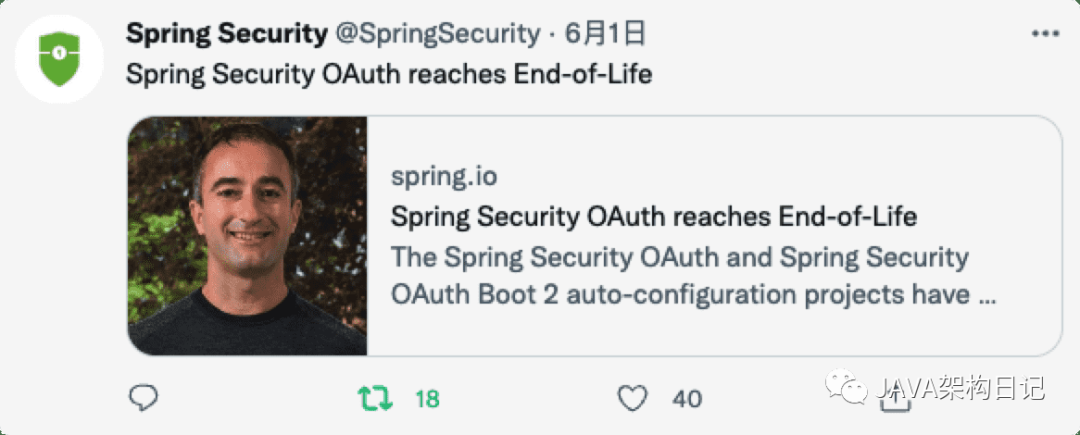
Spring 全新 OAuth 的解决方案
2022.06.01,Spring 团队正式宣布 Spring Security OAuth 停止维护,该项目将不会再进行任何的迭代
目前 Spring 生态中的 OAuth2 授权服务器是 Spring Authorization Server(SAS) 已经可以正式生产使用
作为 SpringBoot 3.0 的过渡版本 SpringBoot 2.7.0 过期了大量关于 SpringSecurity 的配置类,如沿用旧版本过期配置无法向上升级。
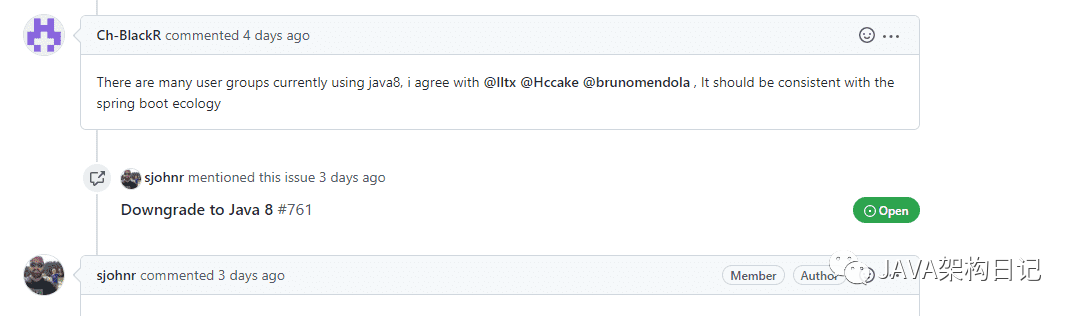
Java 1.8 支持
目前最新的 SAS 0.3 基于 Java 11 构建,低版本 Java 无法使用
经过和 Spring Security 官方团队的沟通 0.3.1 将继续兼容 Java 1.8
springboot 中文社区编译了适配 java 1.8 的版本坐标如下
<dependency>
    <groupId>io.springboot.security</groupId>
    <artifactId>spring-security-oauth2-authorization-server</artifactId>
    <version>0.3.0</version>
</dependency>
授权模式扩展
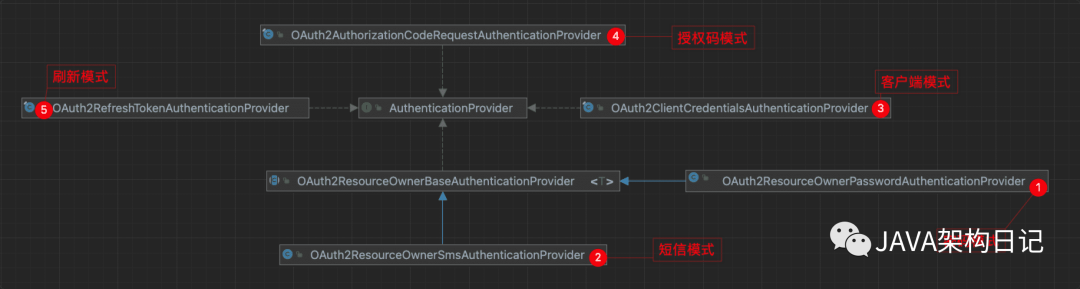
- 扩展支持密码模式,SAS 基于 oauth 2.1 协议不支持密码模式
- 扩展支持短信登录
Redis 令牌存储
 支持Redis存储 令牌
- 官方目前没有提供基于 Redis 令牌持久化方案
- PIG 扩展 PigRedisOAuth2AuthorizationService 支持
Token 输出格式化
- 使用自省令牌的情况下 默认实现为
ku4R4n7YD1f584KXj4k_3GP9o-HbdY-PDIIh-twPVJTmvHa5mLIoifaNhbBvFNBbse6_wAMcRoOWuVs9qeBWpxQ5zIFrF1A4g1Q7LhVAfH1vo9Uc7WL3SP3u82j0XU5x 默认实现
默认实现
- 为方便结合 redis 高效检索 token ,结合 RDM 分组也可以更方便的图形化观察
//统一前缀::令牌类型::客户端ID::用户名::uuid
@Bean
public OAuth2TokenGenerator oAuth2TokenGenerator() {
  CustomeOAuth2AccessTokenGenerator accessTokenGenerator = new CustomeOAuth2AccessTokenGenerator();
  // 注入Token 增加关联用户信息
  accessTokenGenerator.setAccessTokenCustomizer(new CustomeOAuth2TokenCustomizer());
  return new DelegatingOAuth2TokenGenerator(accessTokenGenerator, new OAuth2RefreshTokenGenerator());
}
Token 输出增强
- 使用自省令牌,默认情况下输出的 Token 格式
{
    "access_token": "xx",
    "refresh_token": "xx",
    "scope": "server",
    "token_type": "Bearer",
    "expires_in": 43199
}- Token 增强输出关联用户信息
{
    "sub": "admin",
    "clientId": "test",
    "access_token": "xx",
    "refresh_token": "xx",
    "license": "https://pig4cloud.com",
    "user_info": {
        "username": "admin",
        "accountNonExpired": true,
        "accountNonLocked": true,
        "credentialsNonExpired": true,
        "enabled": true,
        "id": 1,
        "deptId": 1,
        "phone": "17034642999",
        "name": "admin",
        "attributes": {}
    }
}
授权码模式个性化
 注入自定义confirm
基于授权码的开发平台
资源服务器
- 自省方案扩展支持资源资源服务器本地查询
 默认的资源服务器自省模式
- 扩展资源服务器本地自省
 扩展资源服务器本地自省
优势:
**1. 用户状态实时更新 **
2. 减少网络调用提升性能